How to Set Custom DNS Settings on Your Huawei Router
Even with the recent rollout of Fibre across Ireland, there are still many of us just off the grid when it comes to fixed line broadband, the easy alternative is to use a Mobile Broadband service such as 3 – one downside to this is generally the modems/routers supplied by 3 can be locked down in some areas that us nerds like to customise, custom DNS servers being an example. In this guide I will show you how to set a custom primary and secondary DNS server on your Huawei router, in this example I am using the B525-23a as that’s the modem I have on hand, but this should work on most other Huawei modems supplied by 3, Vodafone etc.
Let’s get in to it! To begin, we need to log in to the web browser of your 4G modem:
- Open your favourite web browser (e.g. Brave, Chrome, Firefox)
- Type 192.168.8.1 (the default IP to access the admin web UI) in the address bar
- The default username will be admin
- The default password is the default WiFi password, which can be found on the sticker on the bottom of the modem.
After you log in, you now need to navigate to the DHCP page, this can be found by first opening the Advanced menu item in the top menu, and then following the Router > DHCP menu items on the left, alternatively you use this link to bring you directly to the DHCP page (once are you already logged in).
Now we need to get a console window open, to do this in Chrome, press Command+Option+J (Mac) or Control+Shift+J (Windows, Linux, Chrome OS).
In the console type the below:
allow pastingNow, we can paste in the code to reveal the DNS fields, depending on which version firmware you are running on your modem, the steps will differ slightly.
If you are on an older firmware version – your admin panel looks like this:
If this is the case , paste the following in your console:
$('#dhcp_dns_statistic').show();
$('#dhcp_primary_dns').show();
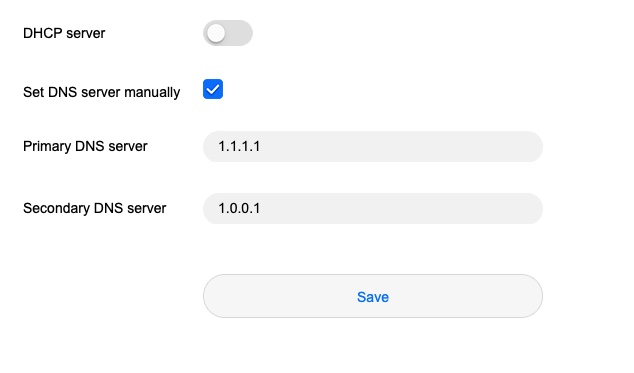
$('#dhcp_secondary_dns').show();If you are on the newer Firmware – your admin panel looks like this:
Then you just need to paste this:
$('#dhcp_dns').show();Tick the box beside “Set DNS server manually”
Now, whichever option you need to choose, you will now be able to set a customer primary and secondary DNS server. Also, once you save the settings and refresh the page, the fields will be hidden again, but yourDNS settings will be saved – I promise.
In my next post, I’ll recommended DNS servers to use, be sure to check back – or even better, sign up to the newsletter below!